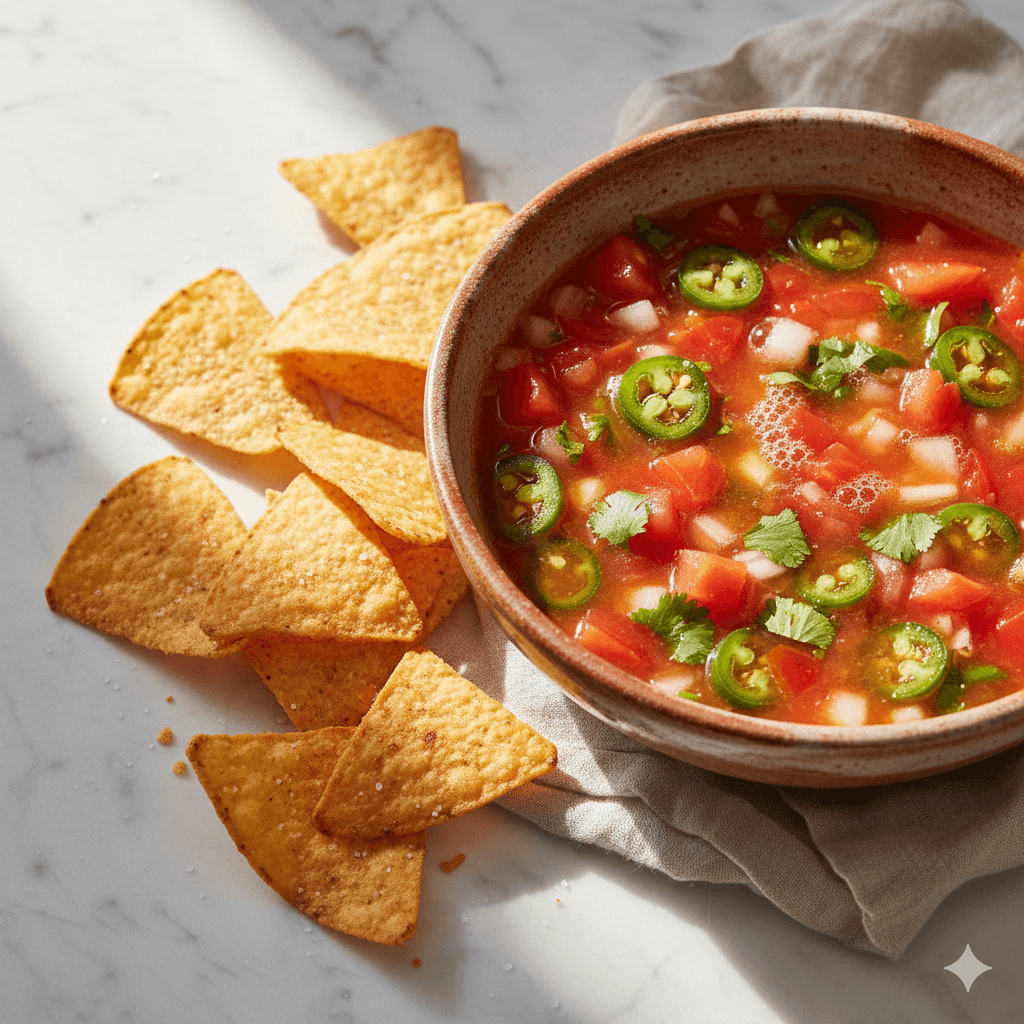
A lacto-fermented salsa recipe starts in the same place as any summer salsa — ripe tomatoes, onion, cilantro, lime — but what happens over the next 2 to 4 days on your counter transforms it into something with noticeably more depth. The fermentation process develops lactic acid, which rounds the sharp edges of raw lime juice and gives the salsa a complex tang that fresh salsa simply can't match. It also means the salsa keeps for 3 to 4 weeks in the fridge instead of 3 to 4 days — a meaningful advantage in the height of tomato season.
This is one of the most beginner-friendly fermentation projects you can make. There's no brine to calculate, no special equipment required, and the ingredients are exactly what you already know how to buy.
Why Fermented Salsa Is Better Than Fresh
Fresh salsa is bright and immediate. The lime juice provides acidity, and the flavor is a direct reflection of the tomatoes and peppers you started with. It's excellent when the ingredients are perfect.
Fermented salsa is different in two meaningful ways. First, the flavor deepens. The lactic acid from fermentation adds a rounder, more complex sourness than lime juice alone — and the mild fermentation of the tomatoes and peppers develops subtle undertones that make the salsa taste like it was made by someone who knows exactly what they're doing. Second, it keeps. Properly fermented salsa holds for 3 to 4 weeks refrigerated, which means you can make a large batch at peak tomato season and have excellent salsa through the end of summer.
For a deeper look at how lacto-fermentation works, see our post on what is lacto-fermentation.
Ingredients
This recipe makes about 1 quart of fermented salsa — enough to fill a standard mason jar.
- 700g (about 1.5 lbs) ripe summer tomatoes — any variety
- 1 medium white or yellow onion (about 150g)
- 2 to 3 jalapeño or serrano peppers
- 3 to 4 garlic cloves
- Large handful of fresh cilantro
- Juice of 1 lime
- Non-iodized salt — use approximately 1 teaspoon (6g) per pound of vegetables, or about 1.5 teaspoons total for this batch
The tomato variety matters. Paste tomatoes like Roma or San Marzano have less water content and produce a thicker, more concentrated salsa. Slicing tomatoes like heirloom or beefsteak are more juicy and produce a looser result. Both work — adjust your expectation accordingly. Cherry tomatoes, halved, produce excellent fermented salsa with a particularly bright flavor.
Step-by-Step Instructions
Step 1: Chop the vegetables. Dice the tomatoes into roughly ½-inch pieces. Finely dice the onion. Mince the jalapeños (remove seeds and ribs for milder heat; leave them for spicier salsa). Mince the garlic and roughly chop the cilantro.
Step 2: Combine and salt. Mix all chopped vegetables in a large bowl. Add the lime juice. Sprinkle the salt evenly over the top and mix thoroughly. Let the mixture sit for 10 minutes — the salt will draw out liquid from the tomatoes, and you'll see brine pooling at the bottom of the bowl. This liquid is what's going to keep the ferment anaerobic.
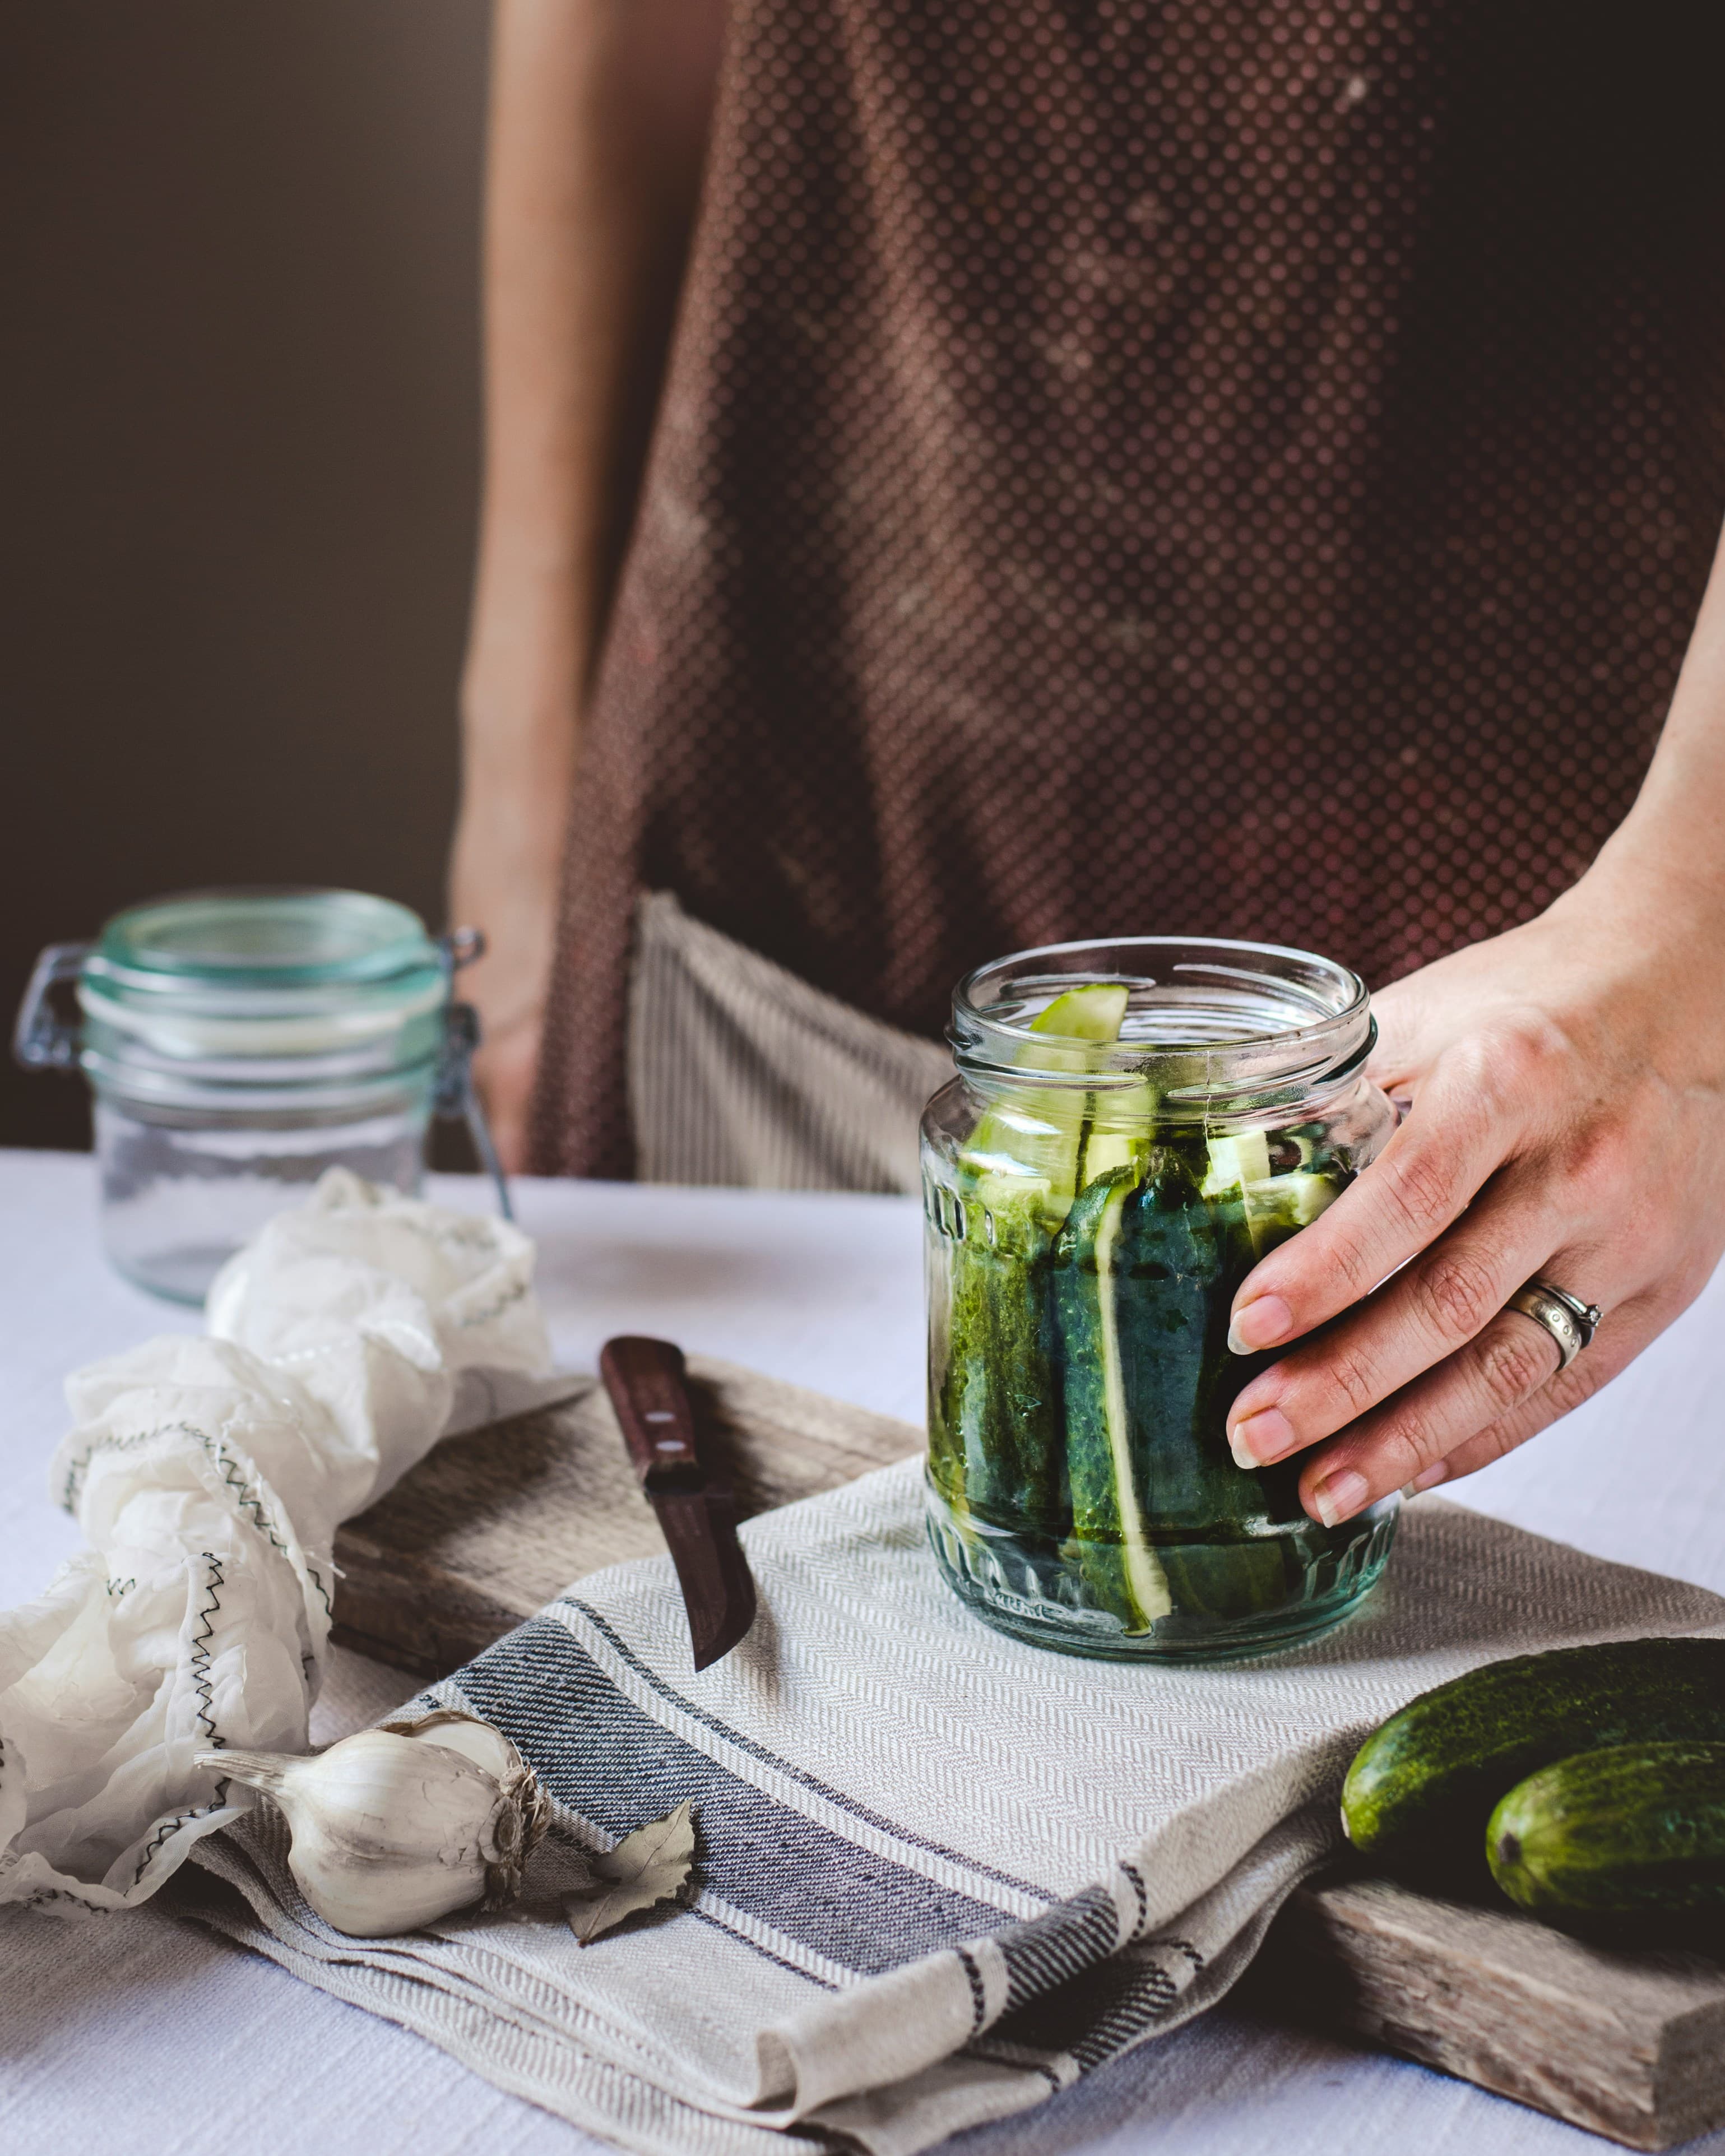
Step 3: Pack into the jar. Transfer the salsa and all its liquid to a clean, wide-mouth quart jar. Press the mixture down firmly with a spoon or your hand (clean). The tomato juice should rise above the vegetables. You want as little air trapped in the mixture as possible.
Step 4: Weight and cover. Place a fermentation weight on top of the packed salsa to keep the vegetables submerged below the liquid. Cover the jar loosely with a cloth or a lid set ajar — CO₂ produced during fermentation needs a way to escape. A properly weighted and covered jar is the key to a mold-free ferment.
The right weight makes a difference
Chunky salsa has a lot of air pockets that want to push up during fermentation. A glass fermentation weight that fits snugly inside your jar is the most reliable solution. The Trellis + Co. PickleHelix has a spiral design that accommodates uneven surfaces — useful for chunky mixtures like salsa where a flat disk weight might leave gaps. See our fermentation weights guide for all the options.
Step 5: Ferment at room temperature. Place the jar somewhere at room temperature (65–75°F) away from direct sunlight. In summer, fermentation moves quickly — expect the salsa to become active within 24 hours. You should see small bubbles in the brine and the liquid may become slightly cloudy. Both are signs fermentation is working.
Taste starting at day 2. At this point the salsa should taste noticeably tangier than when you packed it — still bright, but with a rounder, more complex sourness. Most people prefer their fermented salsa at the 2 to 3 day mark: tangy but still clearly tomato-forward. By day 4, the flavor is more assertively sour and develops the character of a well-aged condiment. Either endpoint is correct — it's a matter of taste.
Step 6: Refrigerate. When the salsa reaches your preferred tang, seal the jar with a regular lid and refrigerate. The cold slows fermentation dramatically. Properly stored fermented salsa keeps for 3 to 4 weeks — significantly longer than fresh salsa.
Seasonal Variations
The base recipe above works across the full tomato season. Here are three variations worth trying with specific summer produce:
Mango salsa. Replace 200g of tomatoes with an equal weight of ripe mango, diced. The mango ferments readily and balances the tomato's acidity with natural sweetness. Increase the jalapeños to 3 or 4 — the sweetness of the mango handles more heat. Ferment for 2 days and taste; the mango ferments faster than tomato.
Roasted corn and tomato salsa. Add 150g of corn kernels, cut fresh from the cob and briefly charred in a hot pan. The corn adds sweetness and texture. Don't roast the corn until very dark — a light char works best. Add with the rest of the vegetables and ferment as normal.
Tomatillo verde. Swap the tomatoes entirely for tomatillos (husked, washed, and roughly chopped). Tomatillos have a natural pectin that keeps the salsa more cohesive, and they ferment with a distinctive bright-herbal flavor. Add a few extra garlic cloves and blend briefly with an immersion blender before packing if you prefer a smoother verde texture.
Using Fermented Salsa
Fermented salsa is a direct substitute for fresh salsa in almost any application. It works on tacos, nachos, eggs, and grain bowls. The fermented version handles heat particularly well — it can be spooned onto grilled meats straight from the refrigerator and acts like a bright, tangy sauce rather than a condiment that falls flat when warmed.
Serve cold or at room temperature for maximum flavor. The fermented character rounds out at room temperature in a way that's different from fridge-cold. If you're serving it at a party, pull the jar out 30 minutes before.
Fermented salsa pairs naturally with other lacto-fermented condiments — a bowl of fermented salsa alongside fermented jalapeños and a pot of black beans is a complete, complex summer meal with almost no effort. For more on the fermented salsa technique and guide, see our complete fermented salsa guide.
A Note on Troubleshooting
Brine didn't rise above vegetables. If the salsa looks dry after packing, the tomatoes may have had lower water content. Make a small amount of 2% brine (1 tsp salt dissolved in 1 cup water) and add just enough to cover the surface. You don't need much.
White film on the surface. This is most likely kahm yeast — harmless, but worth removing. Skim it off, press vegetables back below the liquid, and continue fermentation. For more on identifying common fermentation issues, see our fermentation troubleshooting guide.
Too sour. If you let the ferment run longer than intended and the flavor is sharper than you like, stir in a small amount of fresh lime juice and let the salsa rest in the fridge for a day. The additional acid will mellow the overall profile slightly and help integrate the flavor. You can also mix it half-and-half with fresh chopped tomatoes for a blended result.